|
||||||
|
||||||
|
CueZy Reference.
 Launch the application.
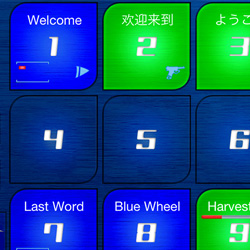
When the pads become blue, play by tapping.
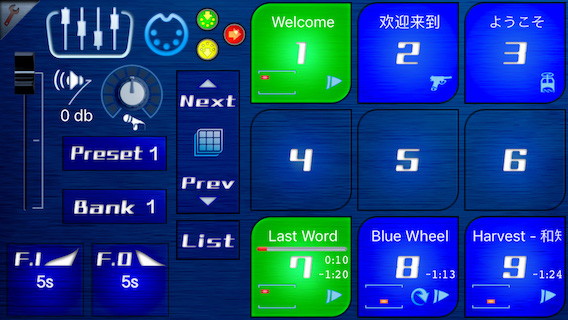
The play view is CueZy’s main screen for controlling audio.
  The sample pad is where the audio effects take place for the assigned audio.
Users can control the selected audio by pressing, releasing, or long pressing the sample pad. ※Pad color
 Blue: Can be played.
Green: Currently playing. Green (flashing slowly): On pause. Green (flashing quickly): Fading in or out. When changing the Preset or Bank, the selectable pad number(s) will light in blue, and the selected pad number will light in yellow. ※Title area
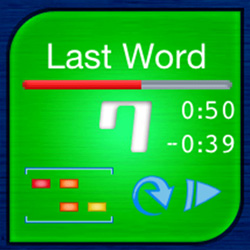
※Time display
On the elapsed time will be displayed on the upper right of the pad number, and the remaining time will be displayed on the lower right of the pad number. ※Status area
※Restriction mark
 Depending on the license, the restriction mark will light up to indicate that the audio cannot be played.
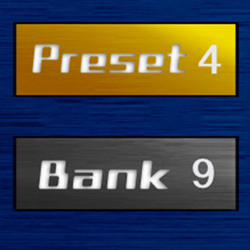 The Preset and Bank buttons take you to different pages where audio is stored. By pressing either the Preset or Bank button and selecting the pad number, the assigned page will load.
 CueZy manages audio by page units.
 A total of nine audio samples can fit into one (1) page. A maximum of nine (9) pages can be stored in the Bank. A maximum of nine (9) Banks can be stored in a Preset. Therefore, CueZy can save a maximum of 81 pages, and a maximum of 729 (9 x 9 x 9) audio assignments can be stored.  The master fader controls the master volume that affects all audio in CueZy. This setting will override individual audio volume settings.
The audio volume control within CueZy can be adjusted through the following three stages.
- Sample volume (Pad editor)
- Channel volume (Fader view) - Master volume (Play view)   The duration of Fade in or Fade out can be controlled by tapping on the button.
To apply the effect, press the Fade in or Fade out button and tap on the selected audio pad. The selected audio pad will now fade in or out for the indicated duration of time.  By using the Live Input, user can send audio to Line/Headphone out.
The volume indicator will light in green after long pressing the Live Input dial. Then, the sound from built-in microphone will be sent to Line/Headphone out. When Live Input is active, tap the dial and the input will turn to standby. (Live Input can be active when built-in speaker is not used. When use the Live Input function, please turn on the Live Input switch from the Setting Screen.)  By using the Next/Previous page button, user can load other sample pages by a single push. Pressing the Next or Previous page button until the button turns blue, then release the finger so the page can be loaded.
The Next page button will load the samples in the next bank. The Previous page button will load the samples of previous bank.  Can be turned On or Off the MIDI function by long pressing the MIDI Switch.
Moreover, both MIDI lamps will blink in red when MIDI setting or connecting status changed.  To change the assigned audio or its settings, press the Edit button and launch the Pad Editor (Editing screen).
 To control the volume of the pad, tap on the fader button and launch the fader view.
To temporarily show the fader view, keep pressing the fader button.
The fader view is a screen that shows the volume and right-left balance of each pad.
Other possible actions through the fader view is playing audio and fading in and out. 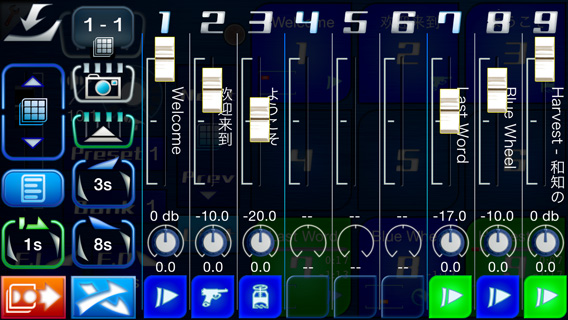  The channel volume controlled by the channel fader, controls each pad's individual volume.
By tapping the fader three times, it will revert to the default settings.  The pan-pot controls each pad's panning (spreading of sound signals).
By tapping the pan-pot three times, it will revert to the default settings.  The cue button has the same function as the play view's sample pad.
Playing and stopping audio is possible by using the cue button.  The fade in time will increase incrementally by tapping on the right side.
The fade in time will decrease when tapping on the left side.  The fade out time will increase incrementally by tapping on the right side.
The fade out time will decrease when tapping on the left side.  By long pressing the Continue button, the Continue mode will change in the following order:
- Off - Continuous play for a single page - Continuous play for all pages When the Continue mode is not “off” and the number of playing audio is zero or one, the user can play the next audio manually by tapping the Continue button. If the Fade cue is on, the crossfade effect will be applied. When the Continue mode is set to “Continuous play for all pages”, and the Page list function is active, the audio will continuously play accordingly with the set page list order. The Continue button will blink while the audio is playing and the continuous play effect is active.  The Cross delay time adjusts the time when the next audio starts. When the crossfade starts, the playing audio fades out immediately and the next audio fades in after the delay that was adjusted by the Cross delay time.
The Cross delay time will increase incrementally by tapping on the right side. The Cross delay time will decrease when tapping on the left side. 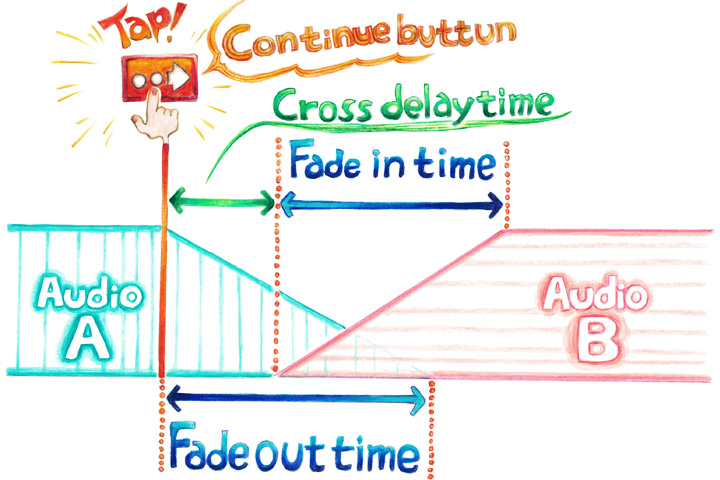  By taking Snapshot in Fader Screen, user can be memorize individual fader positions.
Keep pressing the Snapshot button, the Fader screen will flash once and individual fader positions are memorized. The fader that has position memory will be indicated with green shaded fader piece. By tapping the Snapshot button, memorized fader position can be recall at any time. To remove memory of fader positions, press the Fader reset button or triple-tap any fader pieces.  The stopped channel fader will revert to default settings by tapping on the fader reset button.
All channel faders will revert to default settings by long pressing the fader reset button.  The Next/Previous page button has the same function as the play view's one.
 Tapping the close button brings you back to the play view.
 The music provided in the introductory screen of CueZy is by Umineco, a band based in Kobe, Japan. Umineco is Eko Satsuki on the acordion and Yohei Arai on the contrabass.
(Photo by @aoideal) |
||||||


 The illustrations in CueZy are by Aya Miyazaki, an illustrator based in Kyoto.